Portable Terrain Feature
When a person start playing Wargames it usually follows this pattern:
- Buy the game and play it
- Start painting the miniatures followed by painting their bases.
- Building terrains (because it looks cooler than stack of books)
- Finally building a board of some kind because eventhough the terrain is there the illusion is not complete due to the pink table you got from your sister you are using for gaming!
But then I started playing VOR and suddenly I had to go out and about to find gamers, taking with me my minis and terrain and ..eh... how DO I get my board around?
This is a guide to how to build a a portable gaming board.
This is a list of things I bought to make the board
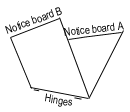
- 2 Notice Boards (23" X 38")
- 2 small hinges
- 1 liter of Black paint and 1 liter of white paint
- Some glue
- Some screw with eyes
Price app. £ 25 ( I don't know what that is in US Dollars, but it really doesn't matter since it is probably cheaper to buy these things in the states anyway).
I also bought 1 Games Workshop Grass Matt, £ 12, but I only needed a little pieces of it, so there might be a cheaper alternative.
How to start.
 The notice boards are quite flat... unfortunately. I hoped to find some notice boards with a 1 inch frame but the I have to pay twice as much and I am not prepared to pay that much for them.
The reason I wanted a high frame was so I could make some high areas on the board to remove the flat feel. It didn't turn out to be a problem though. More about that later.
First thing I did was to place the two notice board front to front and screw the hinges in place so when I open the notice boards I now have one 38 X 46 board instead.
 Example of a cardboard piece.
These shapes are there to give the board an uneven feel or texture, and I a planning on painting it in a grey colour mixed up with sand, earth or something else.
Then I painted the whole thing black to give it a dark base colour.How to do the rest
 Click image to view larger image
 Click image to view larger image
1: to add some vegetations so it looked like and old and used battle field
2: If this board was to be part of a bigger table for some reason it is a good thing with grass edges so it can "merge" with the two kind of gaming boards most people have: green boards and grass matts.
After glueing the grass shapes in place I mixed a concrete grey from the white and the black paints and painted the whole thing with a grey colour and I made sure to paint up on the grass spots' edges as well so it looked like the grass merge into the grey concrete areas.
 Click image to view larger image
Make sure to give the edges of the grass spot a lot of the earth-paint mixture to even out the edge.
Finally I dry brush the concrete areas with white and voila! 1 Portable Gaming Board!
The Poisonous Channel - Rules
As you can see there is a small channel of poison running on the Board. This has special rules to it, but I can still play with the board without using the rules by just saying it is not deeper than 10 inches or something like that.
- When a miniature move across the slim part, it will take a S:3, AM:0 hit on a roll of 1 or 10.
- When a miniature move across the wide part, it will take a S:3, AM:0 hit on a roll of 1 or 10 for each MP it spends. Roll after each MP. In case of more MPs used at once (eg. shooting) you only roll once (the mini doesn't move around that much when shooting and is therefore less likely to get damage)